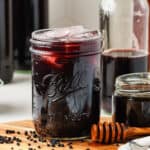
Elderberry Kombucha
Elderberry kombucha is a super delicious health-beneficial fermented drink. Made with elderberry syrup, it has immune-boosting elements too!This recipe will make about four 16-18oz bottles.
Servings 8 servings
Calories 118kcal
Ingredients
Elderberry Syrup
- 1 ½ cups dried elderberries
- 3 ½ cups water
- 1 lemon juiced
- ½ cup raw honey
Elderberry Kombucha
- 2 cups elderberry syrup
- 1 ½ cups water
- 5 cups fermented kombucha
Instructions
- Combine the elderberries, water, and lemon juice in a medium pot. Bring to a boil uncovered and boil for 25 minutes. Remove from heat and set aside to cool to room temperature.
- Once the elderberry mixture has completely cooled, strain it into a jar using a fine mesh sieve and funnel. Mash the elderberry pulp with the back of a spoon to squeeze out the extra juice. There should be about 1 ½ cups of elderberry tea after this process.
- Stir the honey into the elderberry tea until combined, then add 1 ½ cups water to the syrup.
- Gently swirl the fermented kombucha (from the first fermentation process) before you pour it into the bottles to evenly distribute the yeast.
- Use a funnel to pour the fermented kombucha into swing-top bottles, or any bottle that has a tight-fitting lid, to a little over halfway full (about 1 ¼ cup per 16oz bottle).
- Add the elderberry syrup mixture to each bottle (about ¾ cup per 16oz bottle), leaving about an inch or so of headspace at the top of the bottle.
- Seal the bottles tightly and store them at room temperature out of direct sunlight.
- As the fermentation process occurs, you will notice little bubbles forming at the top and the yeasts will float. Check the bottles daily and “burp” them at least once daily to release pressure. If there is built up pressure and bubbles race to the top, then move the bottles to the refrigerator. The 2 fermentation process can take anywhere from 5-10 days depending on the ambient temperature (warmer temps will ferment faster).
Notes
- You can add more or less honey to the elderberry syrup. Adding more honey may make the finished kombucha fizzier.
- The ratio of kombucha to elderberry syrup in the bottles can be adjusted to your liking. I like a little more kombucha than elderberry syrup, but you can change it to how you prefer it.
- It is important to check this kombucha daily for carbonation and burp the bottles as needed.
- If you prefer, the bottles can go right into the refrigerator for the second ferment, but this will slow down fermentation.
- Be sure to mark the date that you bottled it so that you can keep track of how long it’s been to help prevent any bottle explosions due to built-up pressure.
Nutrition
Serving: 1cup | Calories: 118kcal